Thinking about turning that unused space above your head into a proper room? A loft conversion can be a great way to add value and space to your home, but if you’ve got a trussed roof, it’s not quite as straightforward as you might think. These roofs are built differently to traditional ones, meaning you can’t just cut out bits willy-nilly. This guide is here to help you understand what’s involved in roof reframing for loft conversion UK projects, so you know what to expect before you even pick up a hammer.
Key Takeaways
- Before you start any roof reframing for loft conversion UK work, you need to get the right permissions. This means checking planning rules and getting building regulations approval. It’s a must-do step.
- Trussed roofs have lots of timber bits that support the roof. To make space for a loft, some of these might need to be removed or changed. A structural engineer is vital here to make sure the roof stays strong.
- You’ll likely need to add new supports, like steel beams, after modifying the trusses. These new supports take over the job of holding the roof up, keeping your house safe.
- The floor in your loft probably isn’t built for people to live on. You’ll need to strengthen the joists and make sure the floor can take the extra weight.
- Don’t forget about making the loft comfortable. Good insulation, proper waterproofing, and decent ventilation are key to a usable and healthy space, and don’t forget a proper staircase for access.
Understanding Your Trussed Roof Structure
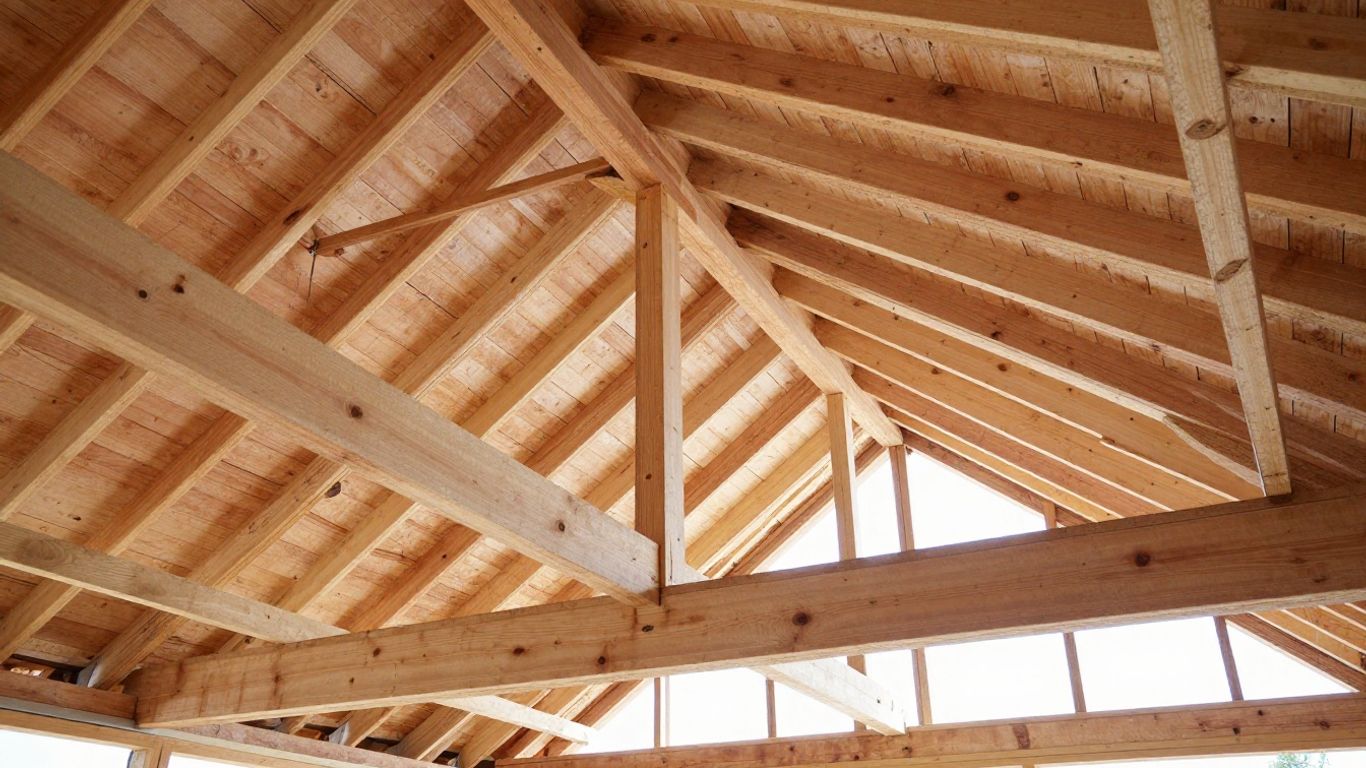
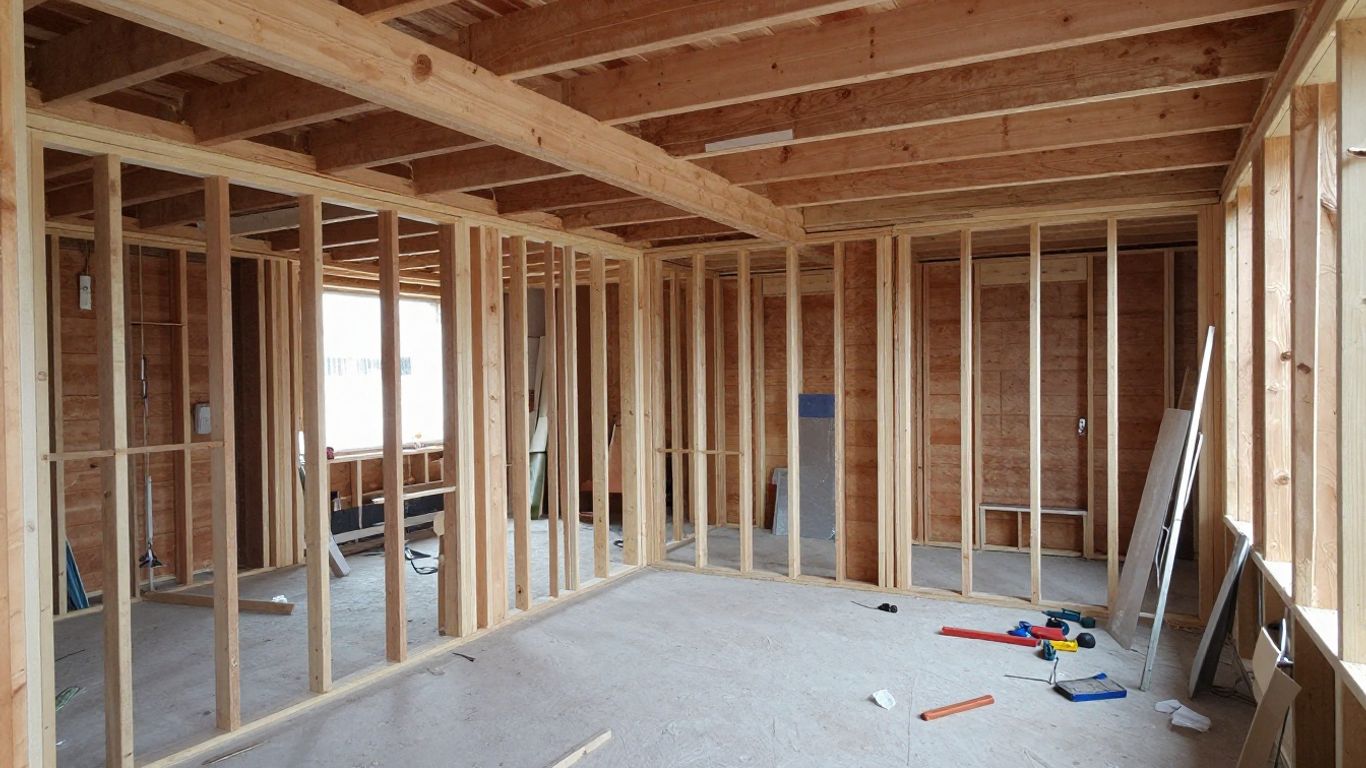
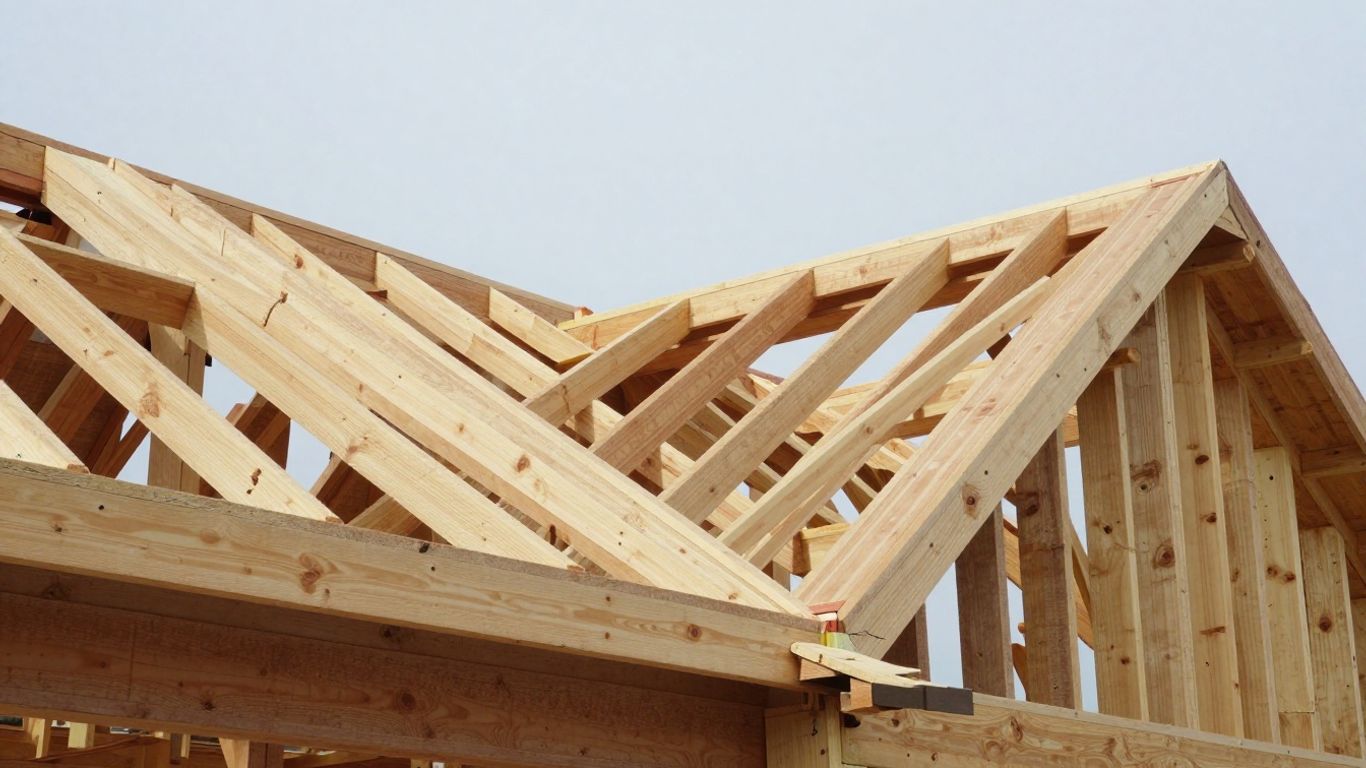
Right then, let’s talk about your roof. If your house was built anytime from the 1960s onwards, chances are you’ve got what’s called a trussed roof. These aren’t like the old-fashioned roofs where you have big, chunky beams running the length of your house. Instead, they’re made up of lots of smaller bits of timber, all joined together to form triangular shapes, often looking a bit like a ‘W’ shape when you see them up close. These are called trusses, and they’re pretty clever, really. They’re usually built off-site and then lifted into place, acting like a pre-made skeleton for your roof.
Identifying a Trussed Roof Construction
So, how do you know if you’ve got one of these? Well, look up into your loft. If you see a sort of criss-cross pattern of timber beams forming triangles, that’s a big clue. These trusses are designed to be strong and light, spreading the weight of the roof evenly across the walls of your house. It’s a bit different from a traditional ‘cut roof’ where the main support comes from larger, individual rafters. Most houses built in the UK from the mid-60s to the 70s, and even later, will have this type of construction. It was a popular choice because it was quicker and cheaper to build.
The Role of Trusses in Roof Support
These trusses are the workhorses of your roof. They’re not just there for show; they’re the main structural elements. Each truss is a carefully engineered unit, designed to carry the load of the roof covering (tiles, felt, etc.) and any weather it might face, like snow or wind. They then transfer that weight down to the supporting walls of your house. Because they’re made of smaller timbers, they’re very efficient with materials, but it also means they’re not really designed with a big, open loft space in mind. The diagonal and horizontal timbers within the ‘W’ shape are what give them their strength.
Assessing Headroom for Loft Space
Now, about that loft space. This is where things get a bit tricky with trussed roofs. Because of all those internal timbers, the usable space in your loft is often limited, especially in the middle. You’ll find the highest point is usually right at the ridge of the roof, and it slopes down quite steeply. For a loft conversion, you need enough headroom to stand up comfortably. Building regulations usually require a minimum of 2.2 metres of headroom across at least half of the converted floor area. With a standard trussed roof, achieving this can be a real challenge, and often means you’ll need to make significant changes to the existing structure, which we’ll get onto later.
It’s really important to get a good look at your loft space before you get too excited about converting it. Measure up, see where the highest points are, and get a feel for how much space you actually have to play with. Don’t just assume it’ll be fine; a bit of early measuring can save a lot of headaches down the line.
Essential Permissions and Professional Guidance
Right then, before you even think about knocking down walls or adding new beams, there’s a bit of paperwork and professional advice you absolutely need to sort out. It’s not the most exciting part, I know, but skipping it can lead to some serious headaches, not to mention hefty fines or having to undo work. Think of it as laying the groundwork for a smooth loft conversion.
Navigating Planning Permission Requirements
First off, you’ll need to figure out if your loft conversion project needs planning permission. For most standard loft conversions, especially those that don’t change the roofline significantly or extend beyond the existing roof space, you might be okay under ‘permitted development’ rights. However, this isn’t always the case. If you live in a conservation area, a listed building, or if your plans involve altering the roof’s shape or height, you’ll almost certainly need to apply for full planning permission. It’s always best to check with your local council’s planning department. They can tell you exactly what’s required for your specific property and area. Don’t guess on this; get it straight from the horse’s mouth.
Understanding Building Regulations Approval
Even if your project falls under permitted development and doesn’t need planning permission, you will need Building Regulations approval. This is all about safety and structural integrity. Building Control will look at your plans to make sure everything meets standards for things like fire safety, structural strength, ventilation, and insulation. They’ll want to see detailed drawings and calculations, especially concerning the new floor joists and any structural alterations. You’ll have inspections at various stages of the build. Getting this approval is non-negotiable; it’s what makes your new space safe and legal to live in.
The Crucial Role of a Structural Engineer
This is where you really need to bring in the experts. A structural engineer is your best mate when it comes to modifying a roof structure. They’ll assess your existing roof trusses and the overall structure of your house. They’ll then produce detailed drawings and calculations for any necessary modifications or new supports. This isn’t just about making sure the roof doesn’t fall down; it’s about ensuring the new floor can take the weight of habitation and that the whole structure can handle the added load. You absolutely must have a structural engineer’s report and drawings before any structural work begins. They’ll also be able to advise on the best way to create adequate headroom, which is often a challenge with trussed roofs. Finding a good one is key, and you can often get recommendations from architects or experienced builders. You can also look for local specialists who handle roof alterations, like Pete Nicholls Roofing.
Here’s a quick rundown of what a structural engineer typically does:
- Assesses the existing roof structure and load-bearing walls.
- Designs any necessary modifications to trusses or the installation of new beams.
- Calculates the required strength for new floor joists and supports.
- Provides detailed drawings and specifications for your builder.
- May liaise with Building Control to help get approval.
Getting professional advice upfront saves money and stress in the long run. It’s easy to get excited about the finished space, but the behind-the-scenes planning and permissions are what make it all possible and safe. Don’t cut corners here; it’s the foundation of your new room.
Structural Modifications for Roof Reframing
Right, so you’ve got a roof with trusses, and you’re thinking about turning that dusty old loft into a proper room. This is where things get a bit more involved than just slapping some insulation up there. We’re talking about actually changing the shape and support of your roof to make it work for you. It’s not a weekend DIY job, that’s for sure.
Modifying or Replacing Existing Trusses
Most of the time, if you have a trussed roof, you can’t just cut out bits willy-nilly to make space. Trusses are designed as a whole unit to hold the roof up. So, to get that extra headroom, you’ll likely need to have some of these trusses modified or even removed. This is where a structural engineer really earns their keep. They’ll look at your specific roof and figure out exactly which parts can be altered and how. They’ll draw up a plan that shows where cuts can be made and what needs to go in to take over the supporting job.
- Get an engineer’s plan: This is non-negotiable. They’ll tell you which trusses can be touched and how.
- Temporary supports: Before any cutting happens, temporary supports have to be put in place. These are like a safety net, holding everything up while the permanent new supports are being fitted.
- Careful cutting: Using the engineer’s plan, the specified trusses are cut. Precision is key here; you don’t want to mess with the roof’s stability.
Installing New Steel or Timber Beams
Once those trusses are dealt with, you need to put something else in to do the heavy lifting. This usually means installing new beams. These could be strong steel beams or specially designed timber beams. They’re placed according to the engineer’s drawings to carry the load that the original trusses were managing. It’s vital that these new supports are put in place before any of the old structure is permanently removed. Think of it like replacing a load-bearing wall – you don’t just knock it down; you put a new beam in first.
Ensuring Structural Integrity During Alterations
Throughout this whole process, the main goal is to keep your house standing up and safe. Every step, from the initial assessment to the final beam installation, needs to be about maintaining the roof’s structural integrity. This isn’t just about the roof itself; it’s about how it connects to the rest of your house. The engineer will also look at how the new floor joists in your loft will be supported and how they tie into the existing walls. Sometimes, you might even need to reinforce the rafters themselves, perhaps by doubling them up or adding bracing. It’s a complex puzzle, and getting it wrong can lead to serious problems down the line.
The structural modifications are the most critical part of a trussed roof loft conversion. Getting this wrong can compromise the entire building’s stability. Always work with qualified professionals and follow their plans precisely.
Here’s a quick rundown of what happens:
- Engineer’s Assessment: A structural engineer surveys your roof and creates a detailed plan.
- Permissions: Obtain all necessary building regulations approval.
- Temporary Supports: Erect temporary supports to hold the roof structure.
- Truss Modification/Removal: Carefully cut or remove specified trusses as per the plan.
- Install New Beams: Fit new steel or timber beams to bear the load.
- Reinforce Joists: Strengthen the loft floor joists to support the new living space.
- Engineer’s Inspection: Have the engineer check the new supports and modifications.
Reinforcing Your Loft Space
Right then, you’ve got your roof structure sorted, maybe even modified a bit, but now comes the really important bit: making sure the actual space you’re creating is solid and safe. This isn’t just about making it look good; it’s about making it stand up to everyday life.
Strengthening the Loft Floor Joists
Loft floors, as they are, are usually just there to hold up insulation and maybe the odd bit of stored junk. They’re not designed for the weight of furniture, people walking around, or all the stuff you’ll inevitably put in there. So, the first thing you’ll likely need to do is beef up those floor joists. This often means adding extra timber joists alongside the existing ones, or sometimes even installing steel beams. The goal is to spread the load properly and stop any sagging or, worse, structural failure. It’s a bit like giving your floor a really good hug to make sure it can handle everything.
Supporting New Load-Bearing Elements
When you start messing with the roof structure, especially if you’ve removed or altered trusses, you’ve got to make sure the new bits are properly supported. This is where those new steel or timber beams come into play. They’re not just plonked in; they need to be securely fixed to the existing structure, often resting on new load-bearing walls or reinforced sections of the existing walls. Think of it like building a sturdy table – you need strong legs and a solid top. Getting this right is key to the whole loft’s stability. If you’re unsure about any of this, it’s always a good idea to get advice from a professional, like those at Pete Nicholls Roofing.
Creating Adequate Headroom for Habitation
This is where you really start to make the space feel like a proper room, not just a dusty attic. You’ve probably already thought about this when considering roof alterations, but it’s worth reiterating. You need enough height to stand up comfortably without constantly ducking. This might involve raising the ridge of the roof, adding dormer windows, or even creating a ‘cut and pitch’ roof if your original structure was a trussed roof. The aim is to get at least 2 metres of clear headroom in most of the usable space, especially around the new staircase. It makes a massive difference to how the room feels and functions.
Remember, the floor joists in a typical loft aren’t designed for living. They need significant reinforcement to take on the extra weight of furniture, people, and daily use. Don’t skimp on this part; it’s vital for safety.
Here’s a quick look at what might be involved:
- Assessing existing joists: A structural engineer will check their size, spacing, and condition.
- Adding new joists: Often, new timber joists are installed alongside the old ones, or a new frame is built on top.
- Using steel beams: In some cases, steel beams might be necessary for maximum strength, especially over longer spans.
- Reinforcing supporting walls: The walls that hold up the new floor structure might also need strengthening.
Enhancing Loft Comfort and Durability
Right, so you’ve got the structural bits sorted, which is a massive achievement. But a loft conversion isn’t just about having more space; it’s about making that space actually nice to be in, year-round. That means getting the insulation and waterproofing spot on, and making sure the air is fresh. Get this wrong, and you could end up with a damp, chilly box that’s more trouble than it’s worth.
Implementing Effective Roof Insulation
Insulation is your best friend when it comes to keeping your new loft room cosy in winter and not a sauna in summer. Building regulations have specific targets for how well your insulation needs to perform, measured in U-values. A lower U-value means better insulation. For pitched roofs in a loft conversion, you’re generally looking at a U-value of no more than 0.16 W/m²K. This usually means fitting a good few inches of insulation between the rafters, and sometimes adding another layer underneath them. Don’t forget the walls and floor too; they’ll have their own U-value targets to meet, typically around 0.26 W/m²K for walls and 0.18 W/m²K for floors.
- Types of Insulation:
- Mineral wool (like fibreglass or rock wool) is common and cost-effective.
- Rigid foam boards offer good thermal resistance in thinner profiles, useful where space is tight.
- Blown-fibre insulation can fill awkward gaps effectively.
Ensuring Proper Loft Waterproofing
This is non-negotiable. Water ingress can cause all sorts of problems, from mould to structural damage. You need to make sure the roof covering itself is sound, but also consider any new elements like dormers or skylights. A good quality breathable membrane laid over the insulation and under the tiles or slates is standard practice. It lets water vapour escape from inside the house but stops rain from getting in. Check for any potential weak spots, especially around flashing and joints.
A well-waterproofed loft prevents dampness, protects your home’s structure, and stops mould growth, which is vital for a healthy living environment.
Optimising Ventilation for a Healthy Space
Condensation is the enemy of a comfortable loft. All those people breathing, cooking, and showering in the new space create moisture. Without good ventilation, this moisture hangs around, leading to damp patches and mould. You’ll need to think about how air can move in and out. This often means installing vents in the roofline, perhaps trickle vents in windows, and definitely extractor fans in any bathrooms or kitchens you put up there. The goal is to keep the air circulating and moisture levels down. It’s not just about comfort; it’s about the long-term health of your home and its occupants. Good ventilation also helps regulate temperature, making the space more pleasant throughout the year.
Completing Your Loft Conversion Project
Right then, you’ve done the hard graft, the structural bits are sorted, and the space is starting to look like a room. Now comes the part where it all comes together and starts feeling like a proper home. It’s exciting, but there are still a few key things to get done.
Installing Access with a New Staircase
Getting into your new loft space needs to be safe and easy, and that means a staircase. This isn’t just about sticking some steps in; it’s about making it fit with your existing home. You’ll want to think about where it goes so it doesn’t chop up your downstairs layout too much. Builders can help you pick something that matches your home’s style, whether that’s modern or more traditional. Remember, stairs are usually fitted during the ‘first fix’ stage, so it’s good to have this sorted early on. It really makes the new space feel connected.
Finishing Interior Elements
This is where your loft really starts to take shape. After the plastering is done, giving you nice smooth walls, it’s time for the ‘second fix’. This involves all the bits that make a room usable and look finished. Think about:
- Electrics and Plumbing: Getting sockets, light switches, and any radiators connected up. If you’re having a bathroom up there, the extractor fan needs to go in now to meet regulations.
- Finishing Touches: Skirting boards and architraves get fitted, giving a clean edge where walls meet floors and door frames. This is also when you’ll be choosing your paint colours and any final decorative touches.
- Storage Solutions: Don’t forget about making the most of the eaves. Builders can often create clever storage spaces here, which are brilliant for keeping things tidy.
It’s worth having a chat with your builder about the order of these things. Sometimes, fitting a bathroom or installing specific lighting might influence when other elements can be done. Good communication here stops any last-minute headaches.
Final Inspections and Certification
Almost there! Before you can properly move in and start enjoying your new space, there are a couple of important final steps. A building control officer will need to come and have a look. They’ll check that everything has been done according to the approved plans and meets all the building regulations. This is really important for safety and for the future. Once they’re happy, they’ll issue you with a completion certificate. This document is pretty vital; it proves the work was signed off and can be important for things like insurance or if you ever decide to sell your home. Getting this right means you can relax, knowing your loft conversion is safe and sound. If you’re in areas like Devon or Cornwall, finding a reputable roofer for structural work is key, and companies like Pete Nicholls Roofing can help with that side of things.
So, you’ve nearly finished your loft conversion! It’s exciting to see your new space taking shape. Before you pop the champagne, make sure all the final touches are sorted. From fitting those last bits of plasterboard to getting the paint just right, we can help ensure your project is completed to a high standard. Ready to make your dream loft a reality? Visit our website today to learn more about how we can help finish your project perfectly.
Wrapping Up Your Loft Conversion Project
So, there you have it. Turning your loft into a usable space, especially with a trussed roof, is definitely a big job. It’s not something you can just wing. Getting the right permissions sorted first is a must, and you absolutely need a structural engineer involved to sort out those trusses. Remember to think about reinforcing the floor and making sure everything is properly insulated and waterproofed. It might seem like a lot, but with careful planning and the right people on board, you can create a fantastic new area in your home. Just take it one step at a time, and you’ll get there.
Frequently Asked Questions
What exactly is a trussed roof?
A trussed roof is like a pre-made triangle frame that supports your roof. These frames, called trusses, are usually made of wood or metal and are joined together. They spread the weight of the roof evenly across your house’s walls, making the whole structure strong and stable, especially against bad weather. Many houses built from the 1960s onwards have this type of roof because it was a quick and cheaper way to build.
Can I actually convert a loft with a trussed roof?
Yes, you can convert a loft with a trussed roof, but it’s not as straightforward as with other roof types. Because the trusses are essential for holding the roof up, you can’t just remove them. You’ll need to get expert help to modify or replace parts of the trusses with strong beams, like steel ones, to create the space you need while keeping the roof safe and sound.
What’s the most important first step before starting a truss loft conversion?
The very first and most important step is to hire a structural engineer. They are the experts who can look at your specific roof, figure out exactly what needs to be done to safely make space for your loft, and create a plan. Trying to do this without professional advice could be really dangerous and cause serious damage to your home.
Do I need permission to convert my loft?
You’ll likely need official permission. This usually involves getting Building Regulations approval to make sure the work is safe and meets standards. Sometimes, you might also need Planning Permission, especially if your house is in a special area like a conservation zone, or if you’re planning big changes like adding new windows or altering the roof’s shape.
How much space do I need for a loft conversion?
For a loft conversion to be considered a proper living space, building rules usually say you need at least 2.2 metres of headroom in about half of the loft area. This is so you can stand up comfortably. When planning, make sure you have enough height, especially where the stairs will go.
Is it okay to try and convert a trussed roof myself?
It’s really not recommended to attempt a DIY loft conversion on a trussed roof. These projects are complex and involve serious structural work. You need specialised knowledge, tools, and skills to safely alter the trusses and ensure the roof remains stable. It’s best to leave this to experienced professionals to avoid accidents and costly mistakes.
About the Author
Zaman K writes about business, digital marketing, health, and lifestyle topics. He is associated with Global Digital Web Solutions, a platform focused on web development, SEO, branding, and digital growth solutions.